Pages

Showing posts with label #4. Show all posts

Wednesday, February 13, 2013

Chalkboard bottles


With the holidays passed, we seemed to have a lot of wine and beer bottles laying around. I cleaned them out and had them in a cabinet because I knew they'd come in handy. While I was painting my chalkboard frame, I figured what better time then to paint the bottles the same.

I let the bottles soak in water to get the labels off. They mostly all came off besides a couple left some sticky residue that wiped right off. I let them sit out to dry while I did some other stuff. 


I used the same roller as I was using for my picture frame chalkboard and did three coats on each bottle. Because they are dark glass, they didn't take as many coats but if you have a clear glass, it may require more. Make sure the paint is completely dry in between coats or it'll clump and streak.

After they were all dry, I decided LOVE is good to write on them since Valentines Day is next month.
A home above our kitchen cabinet is a perfect home for it since its pretty bare up there!
Do you have lots of bottles floating around after the holidays? What a great, inexpensive way to repurpose them.


Monday, February 11, 2013

Chalkboard picture frame


When we moved into our new house, I bought this console table from Target and really like it. It matches our dining room table perfectly and I had a great envision of decorating it cute for the holidays or with pretty decor pieces. Then I realized quickly that with two toddlers, that's not practical unless I want stuff broken. I usually have a couple small things in the center of the table that little hands can't reach and nothing underneath since my boys use that as a place to park their cars. But it is so boring looking! It needs something big!
Enter Goodwill (I go there a lot), a $10 ugly gold frame, chalkboard paint and left over white paint from my tv console and we have a chalkboard frame.


I didn't get a before picture of the frame because I am always in a hurry during nap time to get things done but, it was ugly gold. I just did a rough sand and paint it with three coats of the white. On the detailed parts, I used the end of the brush to get into the small crevices to make sure all the detail showed through.

In between coats, I used my chalkboard paint and did three coats of that on the glass from the picture frames. Make sure in between coats your paint dries all the way or it'll become streaky. (I don't think that's an actual word but you get what I mean.)

Once they are dry, put it back together and there is your chalkboard picture frame.


Sunday, February 10, 2013

Oil Pan Magnet Board

I am a stay at home mom and am always trying to find new ways to entertain my boys. On a recent trip to Arizona, Kristy gifted us with Leap Frog magnet letter sets and we already had the animal set as a birthday present from Jeannie but...I don't want all that on my refrigerator or dishwasher (stepping on toys is not fun) So, I copied Jeannie's post using a oil drip pan as a magnet board/chalkboard for her little man but, decided to skip the chalkboard part since we already have a chalkboard table.

I believe our large drip pan from Walmart was around $10. I bought the tin containers from the dollar section at Target and already owned the shelf. I topped it off with a Dr Suess printable.


I used the Velcro Command Strips to hang the oil pan and it is holding up pretty good.

My boys love sitting and playing with it. They are a little young for words but we work with our letters and sounds.

Quite the success if you ask me!


Thursday, February 7, 2013

Dresser turned tv console


In the past couple years, we have been through multiple cheap tv stands. I've been wanting something large and sturdy (aka toddler proof) but unfortunately, my budget isn't so large. Then I ran across some blogs where people re-purposed dressers into tv stands. Genius! Living on base, I always see people selling dressers because of a PCS (move). I found one I liked and saw potential in, although the before isn't so pretty.


B and I knew we wanted it to look worn with some blue and brown showing through to match our living room. So off to Lowes we went to get some sand paper, paint and brushes. We bought sample sizes of the blue and brown and a gallon of the white which was way too much but I will continue using it for other projects.

We spent a couple nights after the boys had gone to bed working on it. First, we sanded it down.


Then I did a coat of the brown. Let that dry and did a coat of the blue. I wish I was bold enough to leave it blue because I LOVE that color but, we decided to stick to the original plan of white.

                                          
It took three coats of white for everything to be covered. In the process of doing that, I spray painted the knobs with some spray paint I had bought to do our curtain rods (which I haven't gotten to yet but I will...someday). That took two coats.

                                 
We took out the top drawer to hold our cable and DVD player. We measured the length and width then went back to Lowes and had them cut it down to size for us.

Then we painted it to match the white dresser. I did two coats. Now we are ready to put it in the dresser. Only problem is...we didn't think that it wouldn't fit in being that big so B cut it in half then screwed it down in the middle and sides.

We took some sand paper and sanded areas that we thought would show wear, like along the top and sides, on the sides, etc...

                                
Brought it inside and I have to say, I am pleased. We are still needing to make a trip to Lowes to get the panel to cover the cords and I am going to cover the inside area with wall paper so it looks more finished but for less then $100...I love it!


Monday, February 4, 2013

Felt Valentines Wreath


I don't know about you but I love Valentine's day. We don't usually do much for it but I really wanted to decorate. My goal this year is to have a wreath for every holiday (even though B says Valentine's Day is not a holiday). I found a lot of great ideas on Pinterest but really liked this one with the felt heart.

I could not find a heart shaped wreath anywhere. I went to three craft stores with no luck so I used a round one I had here.

I bought a yard of red felt for $4.99 at Joann's (then used a 50% off fabric coupon) and a box of push pins.

B and I turned on a movie and the project began. I used a cup as my guide and traced lots of circles (folding your fabric in half and cutting two at once cuts down some of the cutting). I cut and I cut and then I cut some more and then when I thought I was done, I cut more. Seriously. You need a lot of circles. I should have counted but it was a lot.

After you are done cutting, fold a circle in half and then quarter. Use your push pin and put it through the point then put it the styrofoam wreath. Repeat this process over and over and over again until no styrofoam is showing. You don't have to do the back since that is against the door.

I used some Valentines Day ribbon I had to hang it and I just love it. You can easily change out the ribbon and use it for Christmas too. I finished just as the movie finished so it took a couple hours but well worth it!

(Sorry for the lack of pictures...they accidentally got deleted while attempted to write this blog and take care of my crazies aka toddlers :) But the link gives a great tutorial.)


-Sabrina

Friday, November 30, 2012

DIY Canvas Quote

My boys' bedroom walls are bare. I have tons of ideas I want to do like a fabric tree or tissue paper Pom poms from the ceiling like in their original nursery but I know soon they will be out of theirs cribs :( and into toddler beds which means big boy bedding. (Makes me sad even thinking about toddler beds. What happened to my babies?) And by then, the room decor will change.

I decided a canvas would be cute and I happened to have all the supplies on hand. I painted a canvas with some orange acrylic paint. I did two coats.

For the quote...you see, 19 months ago, Jeannie and Amanda came to meet my boys. Amanda is a great photographer and took some newborn pictures for me. This is one of them:

Perfect, right? :)

Now, if you are fancy and have a circut or silhouette  obviously use those for your stickers...or if you are like me and have that on your wish list *hint,hint*, you can stickers. I have a million scrapbooking stickers and they worked perfect. To make sure I was going in a straight line, I used a piece of paper as my guide.


All done with the quote...then I went outside and spray painted it with blue spray paint. After it dried, pull off the letters and ta-da! Simple. Quick. Inexpensive. And so cute! The walls are still pretty bare but it is a work in progress! 


-Sabrina

Tuesday, September 18, 2012

Picture Frame Art Display

My sister-in-law came into town last week and we were discussing Pinterest crafts. We both had pinned this idea for displaying art: Little Nanny Goat


I have wanting to do something cute to display my boys' drawings. Right now, it's just scribbles but I love their scribbles and hanging them on the wall with scotch tape just doesn't do them justice! :)

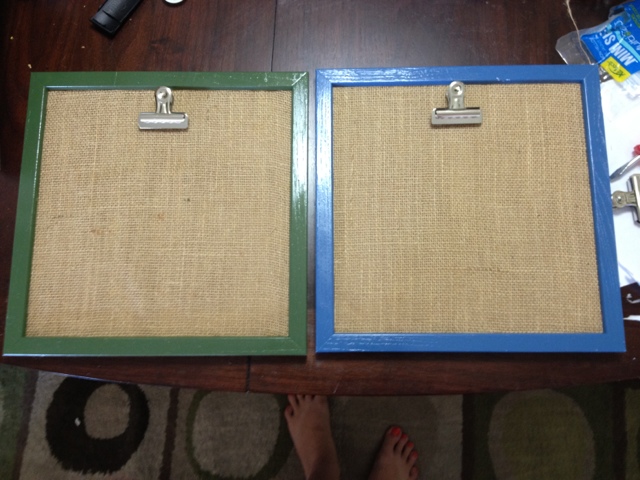
So, off to Goodwill we went! We bought 3 frames from Goodwill ranging from $1.99 to $3.99. I like the ones with a lot of detail. Then we bought some from Walmart...my boys were playing with them, they got broken...back to Goodwill I went. I bought three more frames for $1.99 each. Two of them were still in the packages. Score!  (and I also got a brand new dryer erase board in the package for $1.99. Double score! And I have the perfect project for a later date!) I had a yard of burlap that I got from JoAnn's for $3.99 and we went to Walmart and got spray paint. My frames will be hanging in the boys' playroom at the new house so I wanted bright colors. I also picked up primer and sander. The clips we bought at Walmart for $1.88 for a two pack.

Supplies

First, take the frames apart. Take out the glass and backing so it is just the frame itself. I sanded the frames a little bit and put a coat of primer on. 

Frames with the primer

While the primer was drying, I used my hot glue gun (Caution: Hot glue guns...they really are hot and I often burn myself!) and wrapped the backing of the frames in burlap gluing around the edges. Makes sure you pull the burlap tight so there are no bumps. 


Back to the frames...do a coat of whatever color you wish to use. You may have to do two coats depending on the color. I did two coats of the green. (the other red and blue frame I did when we bought all the supplies last week...I just didn't get pictures of it)

Frames with the colors

After the frames were gone drying, I put the burlap covered backing into the frames and attached the clip. I waited to attach the clips until they were back in the frame to make sure I had them even with how they lay in the frames. 
My Sister-In-Law's Frames
Our Playroom Frames
Such a cute and inexpensive way to display art! And if burlap isn't your thing, use colorful scrapbooking paper!

`

Wednesday, September 12, 2012

D is for Duck..F is for Fish, Bathroom Decor

So, I've been trying to think of crafts to do that I have the space to do it and it's inexpensive. In my little guys' bathroom, I had hung up some pictures that were in their bedroom at our old house. Their shower curtain has the alphabet with the coordinating animal. The theme  of the pictures went.. the colors did not so I found some inspiration on Pinterest (of course!) and decided to give it a try. Here is my inspiration (although hers is made of fabric, I used scrapbooking paper):  Giraffe Silhouette


 I went to Michael's and bought some scrapbooking paper. I liked the blue paper because it looks like water drops. Perfect for a bathroom. I had decided to do a fish and a duck since those are two of the ones on my boys' bathroom curtain. $.99 for 2 pieces and $.50 for the other two.


So, all you do is Google ______(whatever you are wishing to have) silhouettes and click images. There are tons and tons of options. I picked the ones that looked simple enough without a ton of detail since I wasn't sure how'd that look with the paper. Also, I have seen this idea for girls' bedrooms with princesses. Maybe someday I'll get to do princesses but for now, we have a fish and a duck. I was thinking trucks and cars would work too if that was your theme.

Print the silhouette. Currently my printer needs reprogrammed onto my computer and my CD is in storage so, I traced it from the computer screen. Worked just as good. 

I attached the paper with the silhouette onto the scrapbooking paper and cut it out. Then used scrapbooking adhesive to attach is to the backdrop paper.


 I bought the sticker letters from the craft store but you could write them. (my handwriting isn't nearly nice enough for that) or print them out.


Ta-da! Easy. Inexpensive. Cute.

- Sabrina 


Wednesday, August 29, 2012

Making base housing feel like home

Part of being married to a Marine (or anyone in the military) is moving. In the past four years, we have lived in 4 places with the longest being a year and a half. But next month, we will be moving into base housing and hopefully be there for awhile. Anyone in the military knows base housing is simple and basic. I will not complain though because it is over double the size of the place we are at now and has a yard! I want this next house to feel like a nice, cozy home.

The floor plan has a family room and living room, along with a dining room, kitchen, laundry room and half bath downstairs. The front living room will become the boys' play room. I hate clutter so having all their toys in our living room as been stressing me out so I am beyond happy they will have their own space. But, now I have to decorate it. I have pinning like crazy to come up with inexpensive decorating ideas. I want to had color, texture and design without painting or doing anything that we won't be able to remove. So here is my list of ideas and inspiration on making base housing feel like home (without painting or permanent fixtures):

Chevron Curtains. I will be doing these for the boys' playroom but with blue paint. A Drop in the Bucket


Bookshelves - I have two cheap bookshelves from Target that have always been in our spare bedroom. Now one is in the living room and one is in the boys room. I would like to add a pop over color and design to both of them with this wondering idea from In My Own Style

How to make fabric backdrops for book shelves

Magnetic Board....let me just say, GENIUS! We have lots of magnets and they seem to always be all over my kitchen floor so I think this is a great idea for the playroom from From Baby P makes Three

Growth chart by Adventures in Decorating and Design. Moving means not being able to bring a door frame with your little ones ages with you when you  move so this will be great to be able to take with us along our adventure as a Marine Family. 


DIY Picture Canvas. I am going to do a collage of our family photos on DIY canvas like done by Mommy Models Blog . 


My list goes on and on but for now, I think those projects will keep me busy. 

Any ideas on how to make a new house feel like a home on a budget? Any ideas on how to transform base housing into a place you feel at in? I would love to here ideas!

- Sabrina

Tuesday, March 27, 2012

About me: Sabrina

Where to begin? Like the short blurb on the About Us section...I am the youngest of us four girls. My husband, B, and I are coming up on our 5 years anniversary in May. So, I guess I’ll start with B and I:


We went to high-school together ,although we were not fond of each other in those days. I say he just knew he loved me from the second he saw me but he had to play it off as being mean. He would probably disagree with that statement though (but I know the truth!). After off and on contact and hanging out, we started dating in 2005 and got married in 2007. B and I are so different yet a lot alike. We are stubborn yet are very good at meeting in the middle. We seem to balance each other out. In 2008, he decided to do something he had been wanting to do for a while, join the Marine Corps. So...that’s where we are today. A Marine Corps family that has a love-hate relationship with it. Brett’s EAS (end of active service) is coming up so right now, it’s in God’s hands as to what our next step will be.


We are currently at the end of our second deployment to Afghanistan...I say we because anyone who has had a spouse deployed knows that is a team effort to get through these things. The first one was hard and seemed like it went on forever. This one is going by fast but by far harder than first deployment. This time, we have two little guys that are missing time with their daddy even though they don’t realize it yet.


About those little guys...Lil’ B and C are almost 11 months old and beyond the biggest blessing we could have ever asked for. After a couple years of trying on our own, 2 IUI’s and a round of IVF, we were thrilled to find out we were expecting twins. I won’t lie, I was scared to be having TWO boys but now, I wouldn’t have it any other way. They are complete opposites. They look nothing alike. They act nothing alike. They each have a little bit of B and I. Lil’ B looks exactly like his daddy. C is more of a mix, although I think he looks a like Kristy’s girls when they were younger with his bright blond hair. C has a lot of B’s personality traits whereas Lil’ B is more reserved and laid back.

Another thing about me, I moved to Arizona out of high school and went to Toni and Guy Hairdressing Academy. I worked at a salon and spa as a hairdresser in Alaska for a couple years then started working an admin job for the insurance. But right now, I am just enjoying being fortunate enough to stay home with the boys and watch them grow and learn new things. To me, this is the best job in the whole world and I wouldn’t trade it for anything!


That’s about it...I don’t have the most exciting life but I do have a great life and lots of great things to share!

-Sabrina