Pages

Thursday, August 2, 2012

File Cabinet Re-Do

Summertime in Alaska is unpredictable to say the least. Last weekend, we had plans to go for a hike and enjoy some of the amazing scenery around us. BUT we woke up and it was raining...then hailed...then poured...with no signs of stopping.

So, change of plans...David went to his parents house to haul some stuff to good-will for them, and I decided to take this change to get some chores done around the house. Until I realized, I have an empty garage and a file cabinet that I wanted to spray paint! What better time than when the husband isn't around to critique my painting abilities or complain of over spray on tires stacked in there?

Back story on the free file cabinet: my day job was cleaning out an office and they had some furniture that they were giving away or going to donate. I knew needed a new filing system (we've grown out of the plastic file box with handle). So of course, I snagged it. It's been in our garage since March waiting to for a little love to make it pretty.

This the almond-ish before picture after I cleaned it all up from being stored in a messy garage.


The paint with coupon: $4.50 (-ish I can't find the receipt)


Popped the little frames off because I want them and the handles to stay silver.


To cover the handles (since I didn't feel like figuring out how to take them off), I used aluminum foil. Take a piece of foil and fold it over to make a straight edge.


I put the flat edge to the cabinet and wrapped the handle with the foil to avoid any gold paint getting on the silver handle.


First coat: not so great I was thinking this could have been a mistake...


Second coat: a little better.


Much better! All finished with the frame thingys (I'm pretty sure that the technical term) back on.


I have noticed a lot of these same metal file cabinets on craigslist for under $25 but occasionally in the free section too! I will get it in the office and all organized at another time. I may not have a clean house or clean laundry but I have a pretty golden yellow file cabinet. :)

-Amanda

Tuesday, July 31, 2012

Lazy Saturday Crock Pot Gumbo

A couple weekends ago, we (hubs and I) were working on cleaning the garage and getting it organized so hubs can work out there. He likes to tinker in his garage, mess with his car, even build some super cool stuff that I hope to blog about later.


Side note: I married into a Cajun family...not sure if you know this, but Cajun families can cook! I love all the food that my in-laws cook, it truly is comfort food! I have been shown how to cook *most* of my husband's favorite meals, but most of them require your own spin on them.

Ok, back to Lazy Saturday Gumbo (in a crock pot). I knew we would be in the garage all day but I still wanted to have a nice meal and not have to have fast food for dinner. I got all the stuff I needed for my gumbo and threw it in the crock pot hoping it would simmer all day for a yummy dinner.

I used frozen chicken breasts, seasoned them well with my Tony's seasoning and set them to the side while I cooked my onions.


I diced my onions and celery and sauteed them until almost translucent. (I season these with pepper and a little salt, this is optional.)


I then add one cup of my cheater roux *I said lazy gumbo* and one cup water. Allow this to thicken and remove from heat. You can stir the extra chicken broth or water in this pot too, but it's all going to end up in the crock pot to cook.


I diced sausage and put it directly in the crock pot. I just used all beef but you can use whatever you feel like, that is the beauty of gumbo.


I put it on low for five hours. I was in the garage all day with hubs so I would occasionally check on it.


I was thinking it didn't seem to ever actually boil, so I was going to have to cut the chicken up. I pulled a chicken breast out of the crock pot and it shredded apart beautifully. All I had to do was make some white rice to serve it over and we had a nice home cooked hearty meal after working in the garage all day. *I always serve my gumbo with potato salad too*

That's how I made my "Lazy Saturday Gumbo", I am sure there is much to be perfected but it was a good start. If you get a chance to try it out let me know what you did!

Enjoy!!

xoxo
Amanda


Monday, July 30, 2012

Ooey Gooey Dark Chocolate Brownies

Do you ever get a craving for chocolate and just have to make something chocolatey? Please someone say they do....


Well this happens to me. More often than it should. I normally keep baking supplies well stocked in my house so lucky for me, I *almost* always have the stuff to whip something up.

I searched Pinterest for the best dark chocolate brownies, I look at pictures and I decided these were the ones I needed to make! The link took me to Brown Eyed Baker (I was not surprised by this because I love everything I have made from her site already). Her recipe, here, is inspired by Baked: New Frontiers in Baking is rich, dense, ooey, gooey, chocolatey goodness. It's as simple as this:


1¼ cups all-purpose flour
1 teaspoon salt
2 tablespoons dark unsweetened cocoa powder
11 ounces dark chocolate, coarsely chopped
1 cup (8 ounces) unsalted butter, cut into 1-inch pieces
1 teaspoon instant espresso powder
1½ cups granulated sugar
½ cup packed light brown sugar
5 eggs, at room temperature
2 teaspoons vanilla extract


1. Preheat the oven to 350 degrees F. Butter the sides and bottom of a 9×13-inch glass or light-colored baking pan. Line the pan with parchment paper.


2. In a medium bowl, whisk the flour, salt, and cocoa powder together.


3. Put the chocolate, butter and instant espresso powder in a large bowl and set it over a saucepan of simmering water, stirring occasionally, until the chocolate and butter are completely melted and smooth. Turn off the heat, but keep the bowl over the water and add the sugars. Whisk until completely combined, then remove the bowl from the pan. The mixture should be room temperature.


4. Add 3 eggs to the chocolate mixture and whisk until combined. Add the remaining eggs and whisk until combined. Add the vanilla and stir just until combined. Do not over beat the batter at this stage or your brownies will be cakey.


5. Sprinkle the flour mixture over the chocolate mixture. Using a rubber spatula, fold the flour mixture into the chocolate until just a bit of the flour mixture is visible.


6. Pour the batter into the prepared pan and smooth the top. Bake in the center of the oven for 30 minutes, rotating the pan halfway through the baking time, until a toothpick inserted into the center of the brownies comes out with a few moist crumbs sticking to it. Let the brownies cool completely, then lift them out of the pan using the parchment paper. Cut into squares and serve.


7. Store at room temperature in an airtight container or wrap with plastic wrap for up to 3 days.


Are you on Pinterest? Have you found great success with recipes on there? Come find me on Pinterest!

Enjoy!!!

xoxo
Amanda


Wednesday, July 4, 2012

Chalk Board Table

There was this table....a cheap Target table...that was just sitting around. My boys used it to climb on but other then that, no real purpose. I wanted to do something fun with it so I searched Pinterest to find ideas and fell in love chalk board tables. Right now, my boys mostly eat crayons and I have never given them chalk so who knows how they will actually do with it but eventually, I know it'll come to good use. I found my inspiration from this post Honey&Fitz.

Here is the original table...in rather poor condition:


While on a trip to Lowe's for lamp parts (see last blog post), I got spray on primer, spray paint and chalk board paint. Now, I don't know if those of you that are reading this have children but with two 1 year olds, shopping trips tend to be quick. I wasn't sure what color I wanted to paint the table and probably should have thought about that prior to our trip. I was a little pressured since they have to unlock the cabinet and the worker was standing right behind me and the boys were ready to leave at that point so, I quickly picked a color I thought was pretty. Teal. That is my favorite color but when I first sprayed it, it was a little bright. But, B and I decided it's a good, fun color for the little guys.  Anyways... I sanded the table then used primer. The legs of the table unscrew so it was a lot easier to paint that way. I forgot to take a picture of the primer but here it is with the top primered and the rest painted teal. I ended up doing 2 coats of the teal.
 The chalk board paint was pretty simple to do and I even told B while painting that whoever created chalk board paint was a genius in my eyes! I did three coats of the chalk board paint.
 Then you have to "cure" the chalk board paint by putting chalk all over it and wiping it off with a clean rag.
 TA-DA! The end product. I am not a perfectionist by any means so I am sure some people could pick out little imperfections (like B did). I like it and I know the little guys won't care if there is a little bit of imperfections.

The little guys checking out their new table. Really, they could have cared less. They mostly just like their milk first thing in the morning and nothing else.
 C thinks he is the strongest 14 month old in the world. He is always picking things up, pushing things over and just doing anything rambunctious he can think of so here he is pushing over the table .02 seconds after the last picture.
 Simple project and a lot of fun for the kiddos to enjoy! We did try it out later in the day with chalk and like I had suspected, they like to eat chalk as well so it may have to wait a little longer. I am thinking I may put velcro in the corners to put a felt overlay with roads and stuff for their trucks and also a plastic one that may be nice to turn the table into a snack area. We will see!

And since this is my project for the 4th of July...Happy Fourth of July! Thank you to all those who served and continue to serve in order to keep our country free! In honor of that, here is a picture of B, Little B and C the day he got home from Afghanistan: 

- Sabrina


Tuesday, July 3, 2012

Revamp the Lamp

So...I haven't contributed to the blog much. Things have been...a little crazy. Between B returning from Afghanistan, moving, unpacking and just being a mom of two 1 year olds, I have had no time. Luckily things have settled down some. So here I go...

I went to a much needed hair appointment the other day and within 5 minutes of being there, I get a text from my husband that looks like this: (Please ignore the mess)

Yup, my dear precious C broke our lamp by banging it against the wall. While it was nothing fancy, I didn't feel like going to replace it completely and had no idea where to get just the glass part. So I decided to change things up a little and change it to a lamp shade. Problem was, I didn't know where to start. I searched Pinterest and Google trying to find a tutorial on how to change it but couldn't find much. I took off the rest of the glass part and decided to go from there.


The boys and I made a trip to Lowes to look at the lighting section. (Can I just add that Lowes really made me happy that day. I knew they wouldn't have a double cart and it is SO hard to shop pushing a double stroller and carrying a basket but Lowes has awesome baskets with a handle and wheels to pull around. Score!) I saw the lamp harps and knew that is exactly what I needed. It worked perfectly and was only $4. I originally purchased the 10" harp but it was too tall once I got the shade on there. So I went back and got a 8" harp. I won't lie, I had to have B undo the bolt for me because it was on there dang tight. 


I purchased a lamp shade on clearance from Lamps Plus but wanted something bigger. I found one at Lowes for $19. It is pretty simple and I think a trip the fabric store is in the future to cover the lamp shade but all in all, I am happy with it.


                                                                - Sabrina


Sunday, June 3, 2012

Rhubarb-Strawberry Crisp

This may be too late for any of you that do not live in Alaska, as your rhubarb has probably already ripened and been eaten. It is June and mine rhubarb is barely ripe enough to use. I cut a few stalks of the bigger peices today to make my grandma (and my dad) a strawberry rhubarb crisp.


Inspired by Martha Stewart's Rhubarb Raspberry Crisp, I created a Rhubarb-Strawberry Crisp.


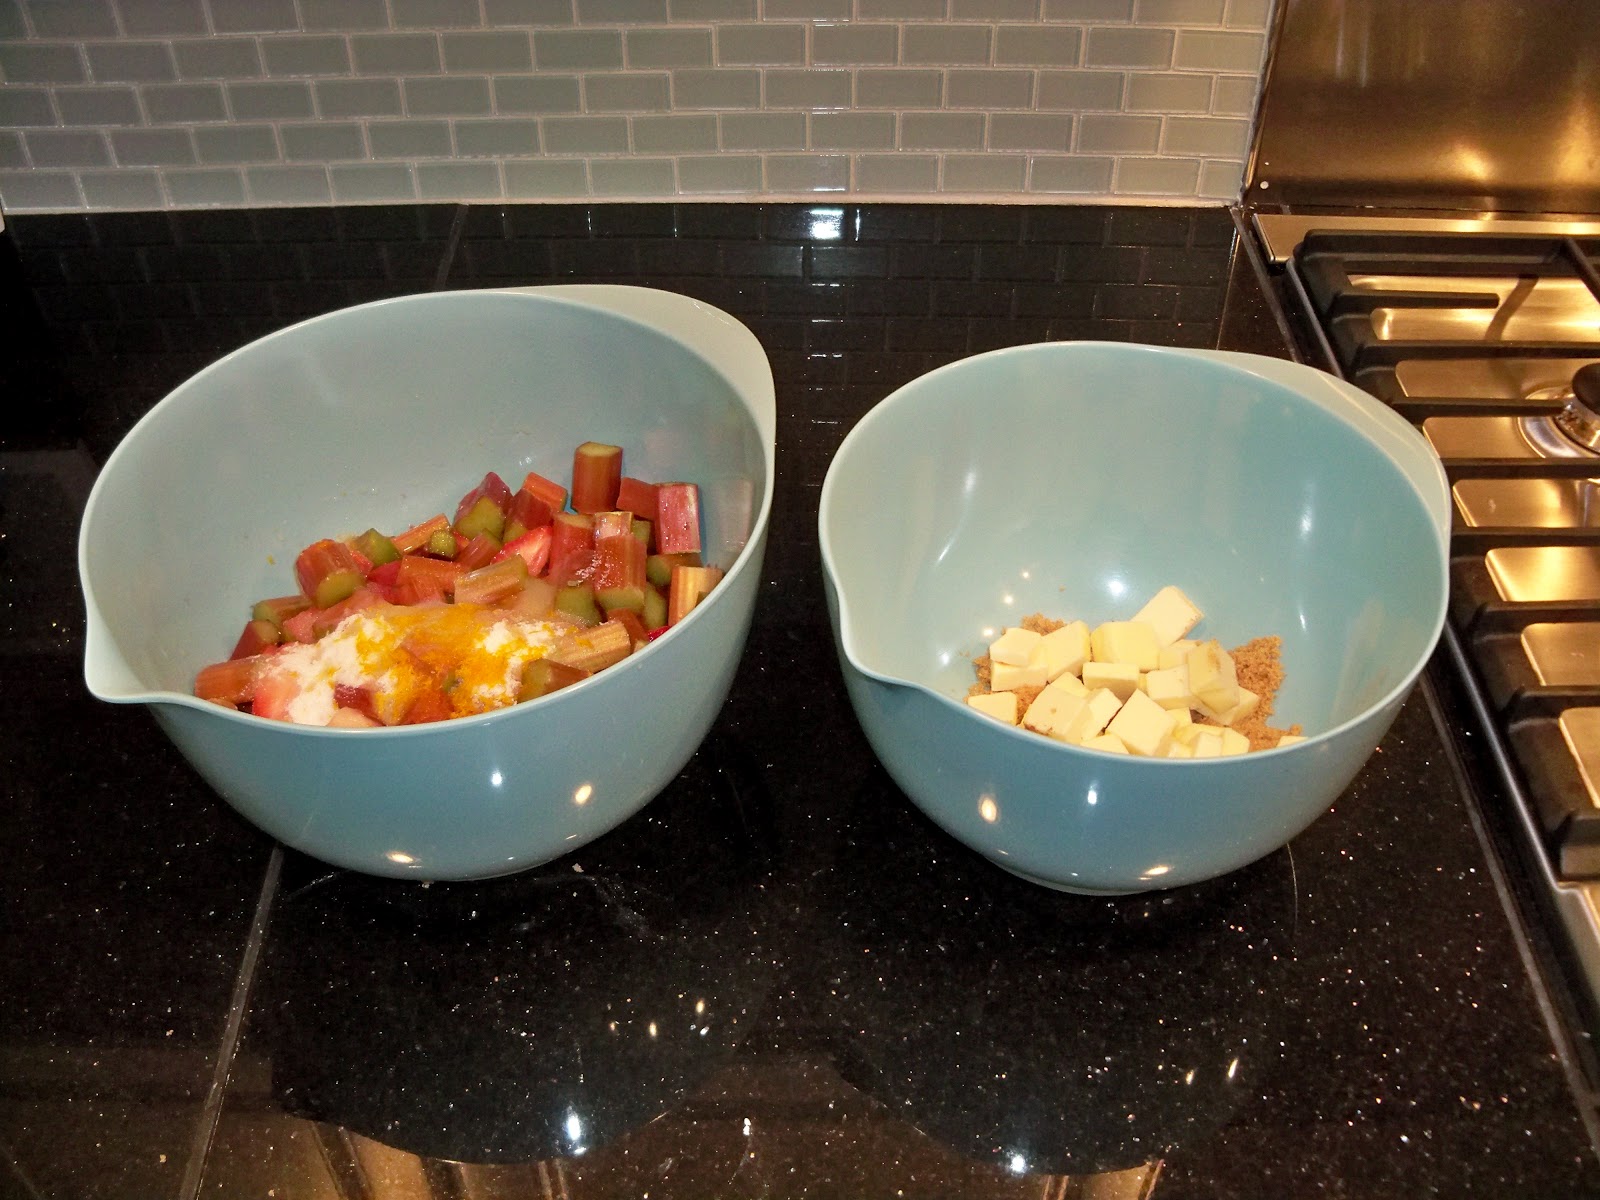
In the first bowl, I have 4 cups of fruit (mostly rhubarb, but if you want it sweeter put more strawberries), 2/3 cup sugar, and the zest and juice of one orange. In the second bowl (on the right), I have 1 cup flour, 1/2 cup brown sugar, 1 stick of butter and 1/2 teaspoon cinnamon.

I mixed the fruit together making sure the sugar/orange juice mixer covers the fruit evenly. I mixed the flour/brown sugar bowl with my hands until the butter was evenly dispersed. Then I added the 1/2 cup rolled oats.


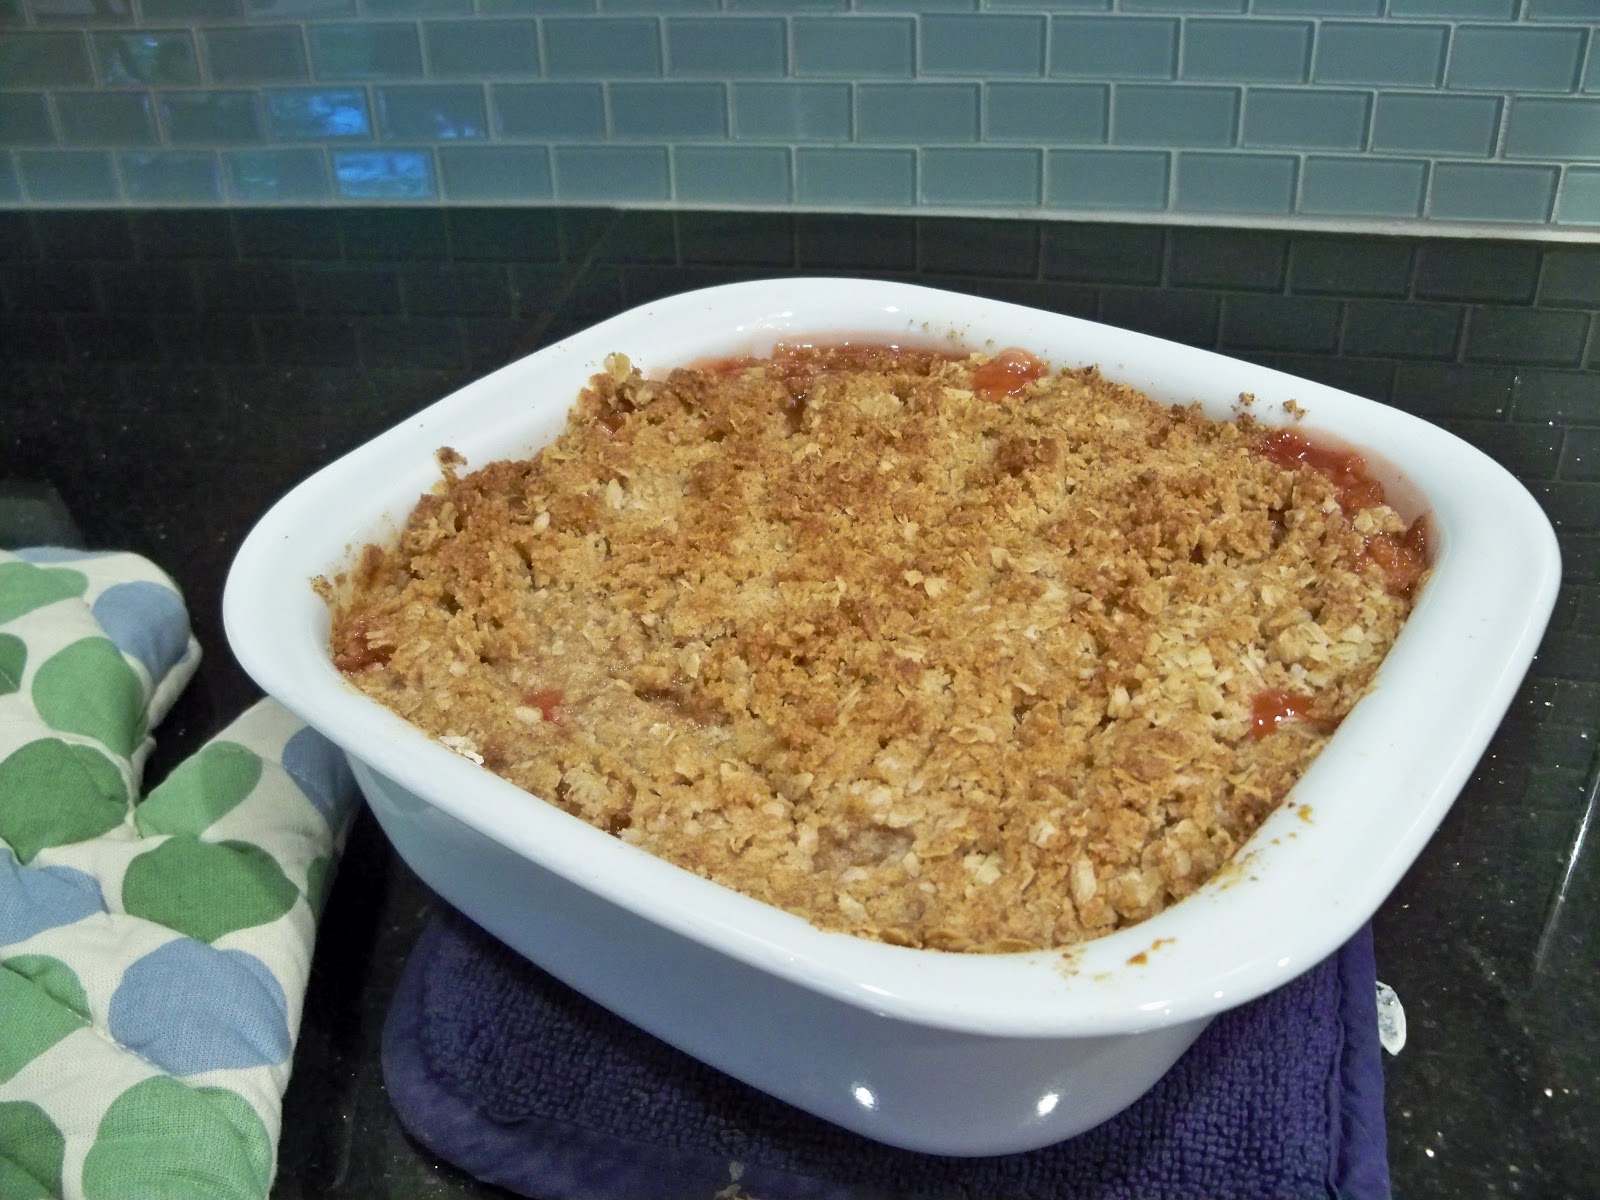
I poured the fruit mixture into the bottom of my 1 1/2 quart baking dish and covered the top with the flour mixer. It went into a 350 degree oven for 45 minutes.

This is what it looks like!


I am not cutting into this one because I am bringing it over to my parent's when it cools enough to transport. I hope it is as good as it smells! Mmmmm..... I'm thinking they should have it with some vanilla bean ice cream though. :)

Thursday, May 17, 2012

Planning for Some Summer Fun

School gets out next week and I have these two adorable monkeys to entertain. I hate hearing "I'm bored", "what are we doing today", or just having lazy kids who do nothing all summer. To prevent this I have created a list of things we will do this summer.  I even went as far as to print a calendar and schedule lots of them so that its not just a plan that we don't follow through on.


Want some ideas for your own summer plans?  Here you go

For their minds

Library reading program (we do this every year)
Children's Museum
Dinosaur Museum
Bingo Stamper Art (working on letter's with HB)
Art Masterpiece (will explain more later)


For their bodies

Croquet
Swimming
Ice Skating
Hiking
Splash Pad
Gymnastics Day (local gymnastics center lets your kids play for cheap on Fridays)


For their/our tummies
yes, its all sweets in this topic but I have a sweet tooth and we eat healthy on a regular basis so these will just be special events.

Make Rice Crispy Treats
Ice Cream Man
Going to Ice Cream in their Jammie's
Smores
Sweeties (an old fashion ice cream parlor)
Dessert for Dinner
Homemade Popsicles
Get Donuts at Night


Just for fun

Water Park
Paper Mache
VBS at our church
Finger Painting
Paint Rocks
Peter Piper Pizza
Lowe's Saturday Workshop
Treasure Hunt for Dad (Father's Day)
Build a Fort
Game Night
Paint By Number ($ store)
Tye Dye Shirts
Pinata for No Reason at all
Paper Airplanes
Flea Market
Boating with Friends
Water Balloon Fight
Date with Dad (added by Bree)


I got lots of my ideas from Aggieland Mommy and the bucket list she made for her family.  I also have lots of other ideas we might add on my Summer Fun Pinterest Board.  If you haven't found me on Pinterest check it out.  I'm always adding stuff.

What are your plans this summer?  Any other ideas that I could/should add?